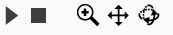
Design Interface
Tools Panel

 | Brush | Produces a single stroke with an offset. |
 | Leg | Produces a leg shape. A single tapering line with its end always parallel the ground. |
 | Select | Selects and edits control points on paths. |
 | Path | Used to draw a path made from control points. Control points are able to be moved, added or removed and bezier curves can be added to the path. |
 | Offset Path | Produces a path with an offset. This path can then have beziers added to it or points added or removed. Offset amount is able to be varied at each point. |
 | Bezier Tool | Adds and manipulates bezier control points on a path. |
 | Measure | Can be used to measure your design. Size is relative to the current selected scale. |
 | Scale | Used to scale a design. |
 | Undo | Undo the last edit. |
Layers Panel

 | New Layer | Adds a new layer to the design. By default the new layer contains a copy of the sketch on the last layer. |
 | Delete Layer | Delete currently selected layers. |
 | Mirror | When selecting layers also select the opposite layer. |
 | Select All | Select all layers. |
 | Guide Layer | Sets the current selected layer as a guide layer. Guide layers do not appear in your final design but can be used to control the shape of slices. |
Slices Panel

 | Single Slice | Add a single slice to your design. |
 | Slice Group | Add a group of slices to your design. Slice groups are added with three clicks - the first two clicks will define the start point and end points, and the third the number of slices. |
 | Slat | Add a single slat to your design. Slats have start and end points and are connected to your design using finger joints. Slats are added with two clicks and can be positioned on an edge of a shape or on the center-line of a path. |
| Slat Slice Group | Add a group of slats and slices to your design. This is the same as the slice group tool except slats are automatically added in between each slice. |
 | Rounded-Rec Cap | End the slice with a square end with rounded corners. |
 | Square Cap | End the slice with a square cap. |
 | Winged Cap | End the slice with a curve on one side and flat on the other. |
 | Cut-Off | End the slice flush with the last layer. |
 | Through All | Make the selected slice cut through all shapes instead of just the shape that it has been placed on. |
 | Flip Slots | Flip slice slots so that they go in the opposite direction. |
 | Smooth | Form slices with curves instead of straight lines. (BROKEN in current version) |
 | Flush Tops | Add extra edges to slices, forming flat facets across each layer. |
Camera Controls
 | Move Camera | Pan the camera view. (Right click) |
 | Rotate Camera | Rotate the camera view. (Middle click) (Spacebar returns camera to the side view) |
 | Zoom Camera | Zoom the camera view at the mouse position. (Mouse scroll) |
Preview Panel
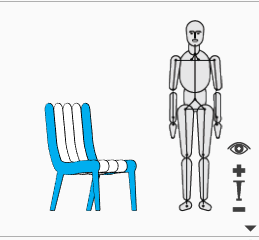
The Preview Panel allows you to change the size of the figure by clicking on the plus and minus buttons, and to toggle the figure on and off by clicking on the eye. You can also quickly select layers in your design by clicking on them in the preview. If the mirror option is selected in the layers panel, then opposite layers will be selected together.
Pattern Preview Panel
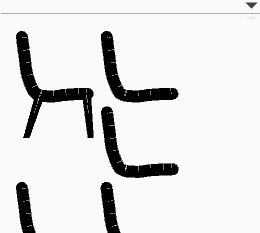
The Pattern Preview panel allows you to quickly preview your design’s cutting pattern. Layers and Slices are also able to be selected by clicking on them in this panel.
Make It Interface
Tools Panel

The Make It screen is for outputting your design for cutting. Here you can set the material size and thickness along with the scale of your design and any other cutting details, for example dog-bones for CNC routing.
 | Plot Design | Save the pattern to a craft-robo plotting file and then send to the plotter (BROKEN currently not complete) |
 | Open the pattern in the native printing dialogue. | |
 | Save to PDF | Save the pattern to a PDF. |
Materials Panel

 | Bevelled Slots | Add a bevel to the entrance of each slot to help with assembly. |
 | Add Dog-bones | Add dog-bones to slots. Removes the internal radius on slots left when CNC routing. |
 | Separate Slots | Separate slot paths from layer and slice paths. |
 | Autopack Pieces | Autopack pieces on the cutting sheet. This can take a minute or two. |
 | Add Labels | Add labels to the pattern. |
Shortcut Keys
| Mac | PC | Function |
|---|---|---|
| ⌘+S | Ctrl+S | Save |
| ⇧⌘+S | ⇧Ctrl+S | Save As |
| ⌘+O⇧ | Ctrl+O | Open |
| ⌘+Z | Ctrl+Z | Undo |
| ⇧⌘+Z | ⇧Ctrl+Z | Redo |
| ⌘+G | Ctrl+G | Physics play/pause |
| ⇧⌘+G | ⇧Ctrl+G | Physics reset |
| ⇧⌘+I | ⇧Ctrl+I | Show/Hide Grid |
| ⌘+E | Ctrl+E | Show/Hide Ergonomic Figure |
| ⌘+F | Ctrl+F | Show/Hide Floor |
| ⌘+M | Ctrl+M | ”Make it” - Go to pattern view |
| ⌘+B | Ctrl+B | ”Design it” - Go to design view |